|
||

|
|
||||||||||||||||||
|
#1
 29-06-2013
|
|||
|
|||
|
1)
Page 1: There is a "Copper Base" (part number TU0222) installed underneath the "Front Upper Suspension Arm Mount." It is too thick to allow the FUSAM to sit flush, causing the need to adjust the tension of the 4 screws used to mount the FUSAM so that it sits level. Was this the result of a design mistake? If it is for weight, there are better ways to do it so the FUSAM would sit flush (no gaps). 2) I assume gluing the edges of the carbon fiber bits is to help prevent delamination, What is the best method to do this cleanly? 
|
|
#2
29-06-2013
|
||||
|
||||
|
1. I think you may have built it wrong, I've built 6 and none of them have the problem you describe......
2. Best way I found was to get some high density foam, put a small amount of glue onto it and carefully wipe it down the edge of the chassis. I did about 6cm at a time
__________________
John Jones --SMD--INSIDE LINE MODELS--PR RACING UK-- My feedback http://www.oople.com/forums/showthread.php?t=79696
|
|
#3
29-06-2013
|
|||
|
|||
|
Quote:
2) I didn't glue my carbon edges, just used some sandpaper and make the edges soft and "none-sharp"
|
|
#5
30-06-2013
|
|||
|
|||
|
Quote:
I doubt it I built it wrong, unless I put the wrong disk in there, but there was not another disk in the kit. The brass disk is a lot thicker than the depth of the depression in the aluminum part it sits in and there is no circular (or any other shaped) depression in the plastic part that goes on top of it. In THIS VIDEO, (start watching at the 4 minute mark) you can clearly see that this guy covered the brass disk with some sort of carbon fiber looking tape. I don't speak his language, so I don't know if he comments on it or not. My guess is that you are excluding the disc, if you are getting a flush fit every time. So I decided to take things apart for measurements and photos. So, for me, this.... 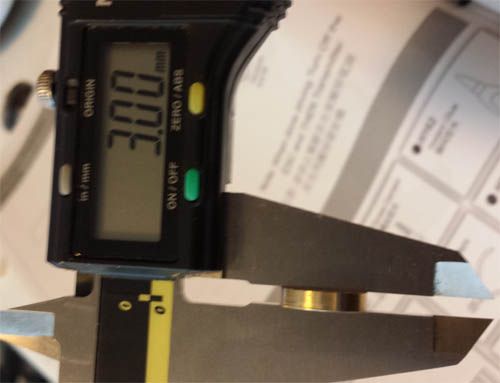 ...minus this... 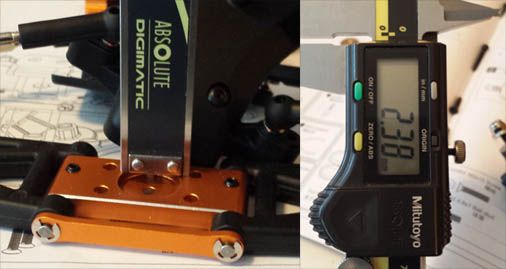 ...equals this.... 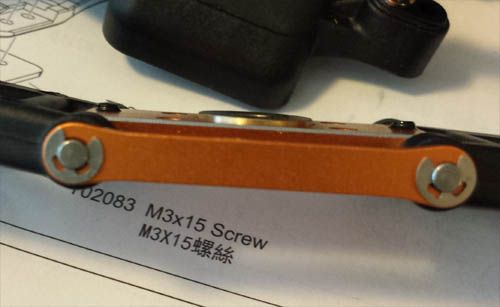 As you can see here, there is no depression for the brass disk. 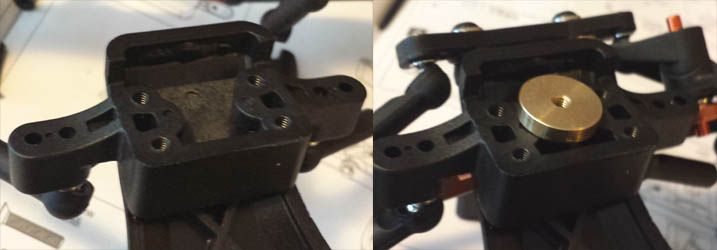 So what you end up with is this.  As you can see, there is a gap exposing the brass disk. Please point out my mistake if I made one. One mistake I see that I could have made is mistake the brass disk for the "copper base" that the manual calls for.
|
|
#6
30-06-2013
|
|||
|
|||
|
To be honest, when I built mine, I naturally omitted the "brass weight" as I have always done with the alloy front pivot blocks since they first came out 2 or 3 years ago for the madrat, xpro, etc..... so I didn't notice it was too thick. Leave it out, it's not structural - just a little extra front weight.
|
|
#7
05-07-2013
|
||||
|
||||
|
Mine has the brass disc in but it fitted perfect. I suspect your disc is oversized. Either give it a rub with a file or contact SMD. The boys down there will be happy to help.

__________________
 PBM Racing 01773 769323 TEAM XRAY RC DISCO
|
|
#9
06-08-2013
|
||||
|
||||
|
I had to file mine as well ,The only build issue i had as all else went together perfectly , & just filed the brass a little and got a perfect fit.
Oh and i de-tangoed it , that orange is awful!!! Pics to follow.
|
|
#11
18-08-2013
|
||||
|
||||
|
Mine never fitted right, but if you trim the plastic slightly it will fit fine. There's no clearance issues if you fit the alloy front upper suspension mount as an upgrade.
|
|
#12
13-09-2013
|
||||
|
||||
|
I don't think his problem is with the brass weight. I've just bought a tm2 and the first operation in the manual shows the alloy bulkhead the wrong way round. The cut out underneath to clear the kick plate needs to face the back. The instructions show it facing front.
|
 |
|
|


 Team C Racing


 mine went together fine with the plastic and alloy block


 Linear Mode

