Previous - 1 - 2 - 3 - 4 - 5 - 6 - 7 - 8 - 9 - 10 - Next

The main chassis is a vast and complex moulding with the entire lower half of the drivetrain tunnel / gearboxes all moulded in.  The chassis feels light in the hand and is finished well, there are a few small rough edges which need a scalpel running around just for cosmetic reasons, perhaps this is because its an old mould ?.
Something you get to notice on losi cars is their affection to point out graphite when they use it, just about any losi graphite composite part has the word "graphite" rather conspicuously stamped all over it.

Inside the kit everything is individually bagged into stages, very nice indeed not to have huge sprues of plastic parts.
The kit comes with not one but 2 manuals, the first is the updated worlds addendum which needs to be read first, the second is the manual for the original XX4.  The worlds addendum only contains diagrams and paragraphs about the areas of the car which are different from the original XX4.
To put it another way you need to read both manuals as you are building, it's a shame Losi couldn't combine the two manuals so you didn't have to swap back and forth, but since this is a limited re-release only, I assume that would cost more than it was worth.

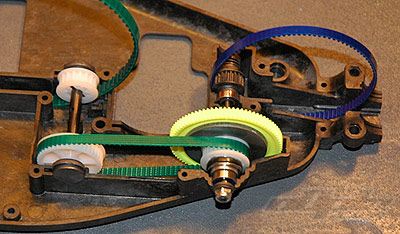
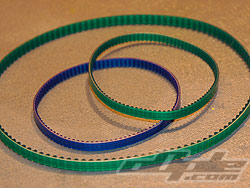
The first step in the build is the transmission.  The XX4 is designed to have the optimum weight distribution at its heart and the drivetrain is designed around this principal resulting in a rather complex arrangement of belts and pulleys which weave their way around and through the major components like motor and cells.  It uses 3 belts in total to take drive from the centre of the car to front (1 belt) and rear (2 belts).
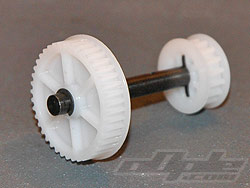
First up is the rear layshaft, a solid steel shaft which needs 2 pins pressing in which are used to engage a belt pulley at either end, one pulley takes drive from the centre belt and the other end transfers this to the long rear belt providing rear drive.

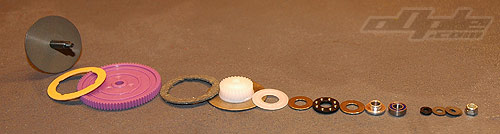
The spur / slipper shaft comes next in the build process, again a solid steel shaft which needs a small pin pressing through its centre which locates the front slipper plate.
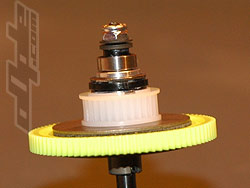
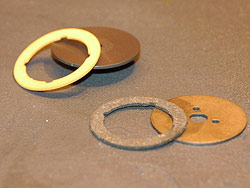
The slipper design is interesting, it’s a dual pad slipper with one slipper plate connected to the front wheels and one to the rear. You cant adjust slip to the front and rear independently but the Worlds Edition does come setup with a different pad for either side of the spur.  The slipper pad and plate for the rear drive provides more friction than the front pad and slipper, thus enabling the rear to receive more torque before slipping occurs.
Some people use a modified front slipper plate and the corresponding pad for the rear which gives an even torque split. 

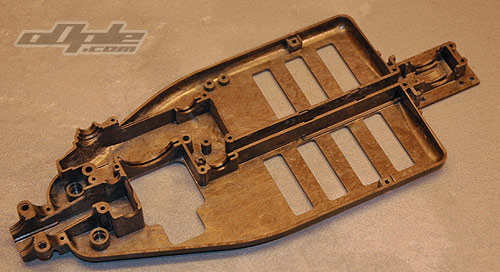
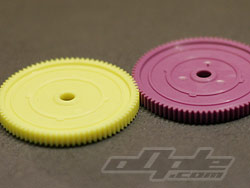
I was advised at this point to swap the kit 84t spur gear (purple) for a smaller 82t (yellow) spur, this is im told to prevent the spur from touching the chassis under (very) heavy landings, this may not be necessary on the re-release but from what I’m told it is the choice of a lot of drivers anyway, it also pushes the motor forward slightly which will give a little more steering.
The rear slipper pad and plate go on after the spur, at this point you can clamp the two plates between your fingers and spin the spur gear, the front slipper will slip and the rear will probably grip, just an illustration of the different torque available to each end.


The slipper is clamped together with beville washers (slightly concave) and a nyloc nut, 4 washers are supposed to be used but my kit only came with 3.  The washers act just like a spring and help modulate the clamping force on the pads.  If you imagine the slipper without any springs, there would only be a slight turn of the nut between fully locked slipper and no drive at all, I think a coil spring would probably provide a finer range of adjustment but the conical washers certainly take up lot less space.

At this point I remembered to degrease the bearings as I go and apply some light bearing oil (trinity royal oil in this case).  The XX4 has a lot going on with 3 belts, friction is one reason the car was replaced by the XXX4, so it’s a good idea to do all you can to make this drivetrain as free as reasonably possible.   Some people go to the extreme of removing the seals from the bearings but this will shorten their life dramatically and I wouldn’t do it, I’m far too cheap.

With the Spur & Slipper assembly together we turn to the opposite end of the layshaft and install the pulley that takes drive to the front belt and diff.  This pulley incorporates an adjustable ratchet style system, named a “one way clicker”, It seemingly works in exactly the same way as the centre one way on the Ttech X10 I reviewed last.  Instead of using a one-way bearing the pulley (which spins freely on the shaft) is driven forwards by a saw-tooth ratchet “one way clicker plate” which is locked onto the shaft and engages similar ratchet teeth on the pulley. 

One-Way Clicker in action.

The clicker plate is held against the pulley by a soft spring which can be adjusted in tension (or an alternate harder spring fitted) and this provides a limited range of adjustment to the oneway effect.

Off power the clicker plate allows the pulley to spin freely (depending on spring pressure the freeness can be varied), when power is applied again the teeth lock together and the pulley is once more part of the drivetrain.

82t Yellow and 84t Purple (kit) spurs.

The one-way clicker can be locked up giving full time 4wd by replacing the spring with some apropriate sized washer to force the two ratchet parts against each other.

Installing the belts is next in the main manual, but before this the Worlds Addendum tells you to file the chassis behind the one way clicker to allow clearance for the updated belts, this, thankfully, is now done for you though there is no mention of this anywhere.

The rear and centre belts are green and the front is blue, the front blue belt is originally from the street weapon, it has slightly less friction but is consequently less robust than the green alternative. Some people run green all round for safety, changing belts track side is not, I'm told, reccomended.

The next few steps in the main manual are ignored if you read the addendum this tells you all the steps which are either revised or passed over from the main manual.

The rear layshaft which transfers the power to the rear belt is installed next.  The shaft is supported at either end by a single bearing, which in turn presses into a plastic holder.  After wrapping the centre and rear belts around their respective pulleys these plastic holders then slot into the chassis providing a very solid mounting for the rear layshaft.

Previous - 1 - 2 - 3 - 4 - 5 - 6 - 7 - 8 - 9 - 10 - Next