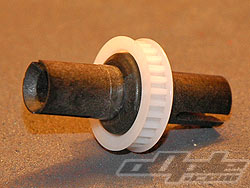
Diffs are next and both differentials are identical except for the pulley used, they are ball type diffs with a nice heavy duty looking thrust races instead of the usual flat washers and individual balls. Last time I owned a losi buying a thrust race like this wasn’t cheap, so its nice that its included.
Built up, the diffs both felt very smooth with no tight spots, very nice.
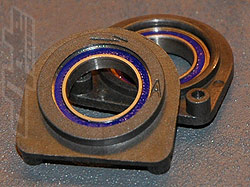
The front and rear diffs of the Worlds Edition utilize plastic out drives. These are ofcourse a LOT lighter than the steel alternative but can sometimes suffer breakage under heavy loads, you used to be able to buy “outdrive savers” from the likes of trinity, these were alloy sleeves which went over the plastic outdrives and just held the outdrives together, these seem to be no longer available and are becoming quite sought after.
Whilst the front outdrives should be ok, its advisable to either obtain some outdrive savers for the rear or replace the diff with a steel version. |
|
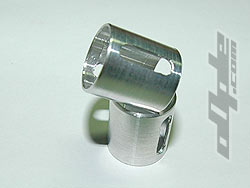
| Chris Long, a fellow racer in the North East region and one of the first in the country to start racing the Xfactory X-5 has just sorted the lack of outdrive savers by designing his own which he sells to anyone who needs them (email at the end of the review). Chris kindly supplied some examples for the review car, they are plain machined alloy, no fancy colours to scratch off and are super light so dont add much to the rotating mass, certainly a lot less than going to steel outdrives would do. The savers are almost a must have on the rear of the car, and recommended for the front too. |
 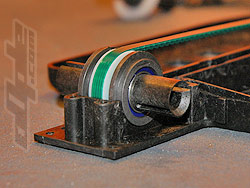 |
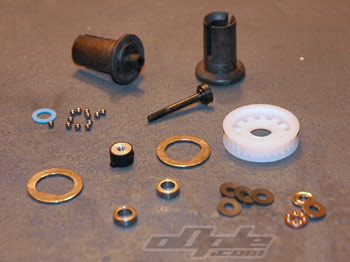
The rear diff is installed first, after degreasing the large outdrive bearings, they need to be pressed into a plastic bearing blocks which are utilized to adjust belt tension. The car comes with 2 sets of these, type A and type B, these are moulded in such a way that the bearing hole is offset from the centre, so depending on which way round you install them they shift the bearing and in turn the diff forward or backward slightly. |
 |
| In all, there are 4 tension settings for the rear belt, |
|
Type A has the most extreme effect, with the small moulded-in arrows pointing backwards the belt is at its tightest, with the arrows forward the belt is at its loosest. The type B bearing holders are exactly the same idea but move the diff less in either direction.
A good friend Pete Byrom who was one of the few running a brand new XX4 Worlds (from the far east) last year, advised on running the belt at its loosest setting (A blocks, arrow forward) so this is what I went for. I wouldn’t personally describe this “loosest” setting as loose, the drive train at this point is certainly far from free running, but I’m told it will bed in nicely.
Chris Doughty from Team Losi suggests running the car on the bench on a few cells for a while, to ease all the parts in and free things up. |
|
| |
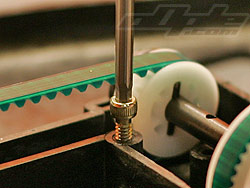
With the rear diff in place the main belt / spur cover needs installing, first you are advised to pre-tap the holes in the main chassis with a gold coloured “tapping screw” provided in the kit, I did this but only put about 2-3mm of thread into each hole just so the screws have an initial guide.
The main belt cover is huge and extends from the back of the car, covering the rear diff, and extends all the way to the spur gear, secured by 9 screws from above and 2 below, its quite a task to change a rear or centre belt if one was to suffer damage as virtually the entire car needs taking apart, with the green belts this hopefully should be rare.
TIP
Some people put a diagonal cut in the main belt cover, across where the rear layshaft is, this enables you to access the centre belt and spur gear more easily. |
 |
| Pre-Tapping all the chassis holes. |
|

|
|
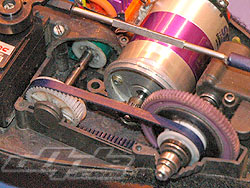
I snapped a couple of photos of Daniel Carters XX4 mid spur change track-side at Batley Buggy Club.
Dans pinion wasnt secured properly and ended up chewing the spur gear. Without the cut in the belt cover there would have been no way for him to get the car ready in time. |
|
|