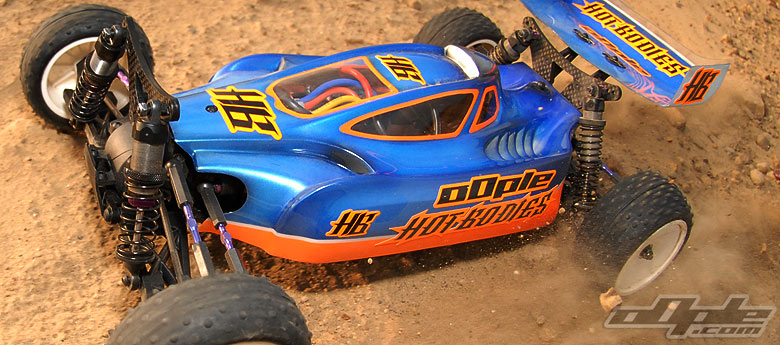
John Price - Test Pilot of the D4 review car:
I remember the first conversation I had with Jimmy, when some months ago he mentioned the possibility of me running a long-term test with the new Hot Bodies car. Although very grateful of the offer, I did if I am being honest have mixed  feelings. This was on one hand because my last years review car (the X Factory X5) had been more than kind to me, my best result coming at the Batley national with a 32nd overall. The other concern I had was that this was from a company (Hot Bodies) who are pretty much unheard of in 1/10th off road up to that point. I couldn’t help thinking that being their first attempt at this class, the car would somehow need development work before it would be a competitive package. feelings. This was on one hand because my last years review car (the X Factory X5) had been more than kind to me, my best result coming at the Batley national with a 32nd overall. The other concern I had was that this was from a company (Hot Bodies) who are pretty much unheard of in 1/10th off road up to that point. I couldn’t help thinking that being their first attempt at this class, the car would somehow need development work before it would be a competitive package.
Upon first seeing the HB D4 for the first time, I was immediately impressed with the quality of the kit parts. The multi lingual manual was also very clear and concise and we had no trouble following each of the steps. |
All the plastic mouldings are worth a special mention, they are frankly the best I have seen to date. I had a sharp scalpel ready to trim off the injection burrs, as I do when building any kit, but to be fair it was very rarely needed. Another nice touch was that on each sprue there was a key number moulded in next to the part. This number is shown in the build manual so there can be no confusion between parts, which may be only subtly different.
I have seen the odd post on forums referring to the D4 as “Bland” because it is anodised in black. Never having subscribed to the blue is bling brigade myself, I have no problem with this, as I much prefer function to form. Once again the quality and fit of the alloy parts was first rate, even if they are plain black! I took time out to superglue the edges of all the carbon parts, again all of which were cut to a very high standard. |
The Screws supplied with the kit were closely scrutinised, as in previous reviews there had been occasion to notice other manufacturers cutting costs in this area (Tamiya, Kyosho). Having decent fixings can make the difference between an easy or a difficult build. The quality was once again to a very high standard, however in the build manual, all screws are listed by their respective part number. This was the most nonsensical thing I came across in the build. To have to look at the key on the left of the page to find out exactly what is a Z352 is ridiculous, when it would have been so easy to say a M3 x 8mm is needed. By all means add the Z352 code as well to assist with spare part ordering, but please can we have sizes in future manuals.
Working through the manual, each of the steps was easy to follow, and the car pretty much effortlessly took shape (albeit slowly as Jimmy kept stealing parts to go photograph!). There were few observations to pass on, however I would recommend using a 3mm tap to pre-thread the plastic parts. The mouldings are excellent if a little hard work to make an initial thread into. The inclusion of a pre tapping screw similar to that supplied by Losi would have been a welcome addition to the kit.
Other than having to measure the thickness of the odd shim to ensure the correct usage, little else needed clarification. One anomaly in the manual was the adjustment of the slipper. You are instructed to tighten it fully then “Loosen 1 ¼ turn”. I read this as loosen a turn and a quarter, however it was clear once attempted, it should actually be read as loosen one quarter of a turn - a problem with the translation perhaps. John |
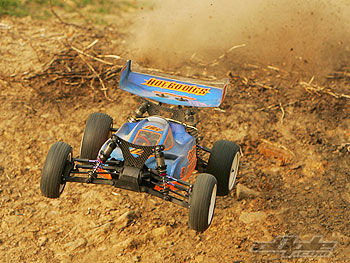
My first drive of the D4, other than gently creeping around a very rough quarry for the review photos, would be at the Bury Metro national. The prospect of a debut at such a large event may not have been ideal, but I do know the track reasonably well, which would help. Bury is a multi surface track, being largely high grip astro turf, along with grass, cobbles and plenty of lumps bumps and jumps to give the car a thorough workout.
I began by using the practice sessions to learn the track and the car without trying to push at all. After practice one the only change I made since the build, was to remove the outer row of spikes from the tyres to try cut down the grip roll. Following practice two, I added an extra washer under the rear hub ball studs (making a total of 2) and I also moved the rear shocks out one hole on the tower to stand them up a little more. I hoped this would make it a little more progressive when the rear end did start to break away.
I went into the first round of qualifying and the car was noticeably worse than before. I also broke a rear hub due to the fact that the extra washer had left the rear ball studs with insufficient thread into the hole. Following a chat with the HB team drivers, I made changes again before round two. The guys kindly helped us out with a replacement hub and some longer ball studs. I took advantage of this by raising the height of the ball on the hub to a total of three washers, taking the ball cup to within about 0.5mm clearance of the inside of the wheels. I also laid the rear shocks down to their original position of 3rd hole in on the tower. |
|
| Round two was better, the car felt to be going in the correct direction if a little too soft for the high grip Bury track. Prior to round three I changed the springs to Losi blue up front and Losi pink at the rear. These are a direct fit and require no modification. The kit black springs are rated at 3.54 and 1.91 front and rear, with Losi blues being 3.8 and pinks 2.3.
For round three the car felt the best so far, but I still felt there was more to come from it. Once again on advice of the team drivers, I changed the rear shock pistons to the #2 and filled up with 30wt oil. I moved the rear shocks out one hole on the tower again.
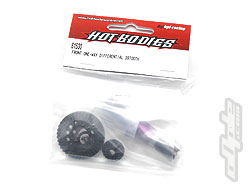
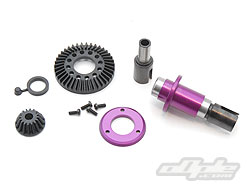
For the final round of qualifying, it was immediately noticeable that the extra pack given by the smaller piston did stop the rear collapsing quite so quickly. Before going into finals I installed the optional one-way diff unit and went up to 40wt oil at the front to compensate. |
 |
 |
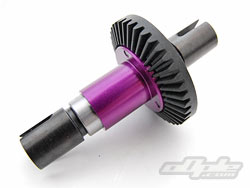 |
| The optional one-way diff unit comes with everything you need to replace the front differential. Using hardened steel outdrives and heavy-dury one-way bearings, this is a great upgrade for smoother tracks and to suit personal preference. |
In the final, the most pertinent observation was how little difference the addition on the one way had made. The turn in was better, but I did expect a much more prominent change than I actually felt. I won the final easily, but I was, if I am being honest, struggling to keep a consistent error free pace. I think further honing of the setup will bring the car to a point which suits both my ability and driving style.
As far as a general overview on my first day with the D4 goes there are a few points to make. Reading the above you can easily notice that all the changes made were to the rear of the car. I was largely happy with the front end. It turns in reasonably well and holds its lines satisfactorily. The car is certainly robust, the large number of heavy crashes I had resulted in nothing worse than a cracked front shock tower. I don’t particularly like the plastic cell trays, as they seem to fall out every time you move the car (without cells in place obviously).
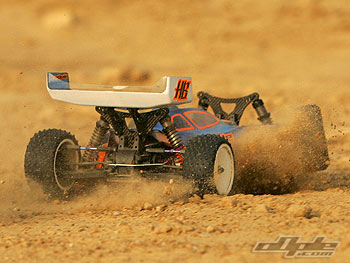
 My second outing with the D4 was at Southport for the North West regional meeting. This track is similar to Bury, but perhaps quite a bit bumpier. I was running both 2&4WD classes on the day so setup changes would be very limited due to the lack of time between runs. I had installed the optional wheel hex’s which allow the running of the Losi type wheels up front, common to so many of the modern 4wd cars. This opened up the tyre choice options to what I already owned, should the weather conditions change.
The first round was wet, and I managed to TQ the round, I was very happy with the car. The remainder of the day was dry however, and as soon as the pace picked up in the more favourable conditions, I was much less comfortable. Once again I was struggling mostly with keeping a consistent pace and found it difficult to run a heat without some sort of error or crash. It was noticeable that the car could be dropped from quite a height without actually bottoming out, suggesting too much 'pack'. For this reason I went down to 25wt oil in the rear, and this proved to be a fair improvement. The other change made to the car was the servo saver. Either during the build it had been set too slack or perhaps it had slackened slightly once bedded in (thanks to Mr Lowe for noticing this). I tightened it up considerably and the steering was much more consistent.
|