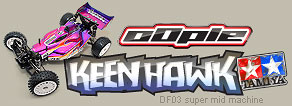
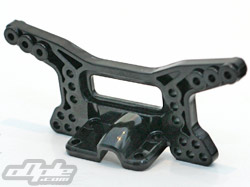
The shock towers on the Keen Hawk are large plastic items – again the same shiny plastic as seen on most of the car. This does have enough flex to resist some serious abuse, the rear tower in particular being so high exhibits a lot of flex (if you push hard enough) and a stiffer tower wouldn’t go amiss for the race track. Certainly for playing and a bit of serious ‘bashing’, shock towers don’t get much better than this. |
 |
 |
 |
Front shock tower |
rear shock tower |
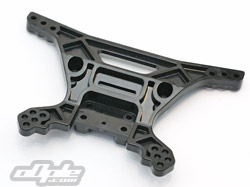
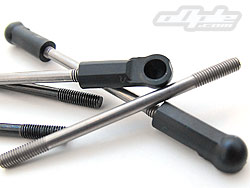
camber links and shocks pivot on ball studs |
The rear shock tower attached to the newly assembled gearbox with four self tapping screws. Before this however the wing mounts and ball studs are attached - the former (wing mounts) being supplied in two angles though I couldn't find any mention of this fact in the manual.
Did I already mention the pain of screwing long self tapping screws into this hard plastic? For a car of this level, which wont be regularly taken apart it's relatively fine, and the screws do seem good quality - but I'll say it again, upgrading to hex-headed screws would be a worth while move. 
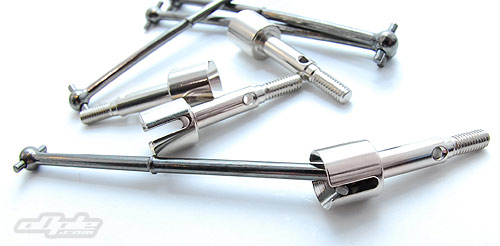
There are several camber link holes on the shock tower and give a few setting options. The actual camber links are simple threaded steel rods – no turnbuckles are included which is a shame. These are harder to set and give less adjustment than turnbuckles – they are also hard to assemble since there is no tool provided to grip the plastic rod ends whilst tightening them. |
 |
 |
 |
 |
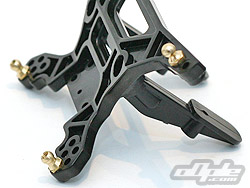
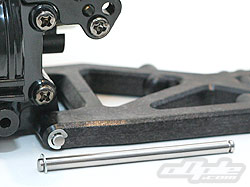
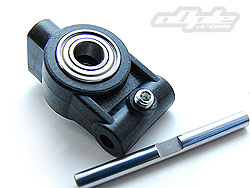
Completed gearbox with shock tower |
All links pivot on brass balls |
Camber links - hard to adjust |
The rear suspension arms come next – these are a different type of material to the rest of the car so far, they feel stiff and strong. The arms mount up directly onto the gearbox rather than having separate hinge pin holders – this does mean that it isn’t possible to alter the anti-squat or inboard toe angles. The other drawback of course is that a heavy crash could damage the gearbox – a much bigger job to replace than a simple pivot block.
The inboard hinge pins are secured with ‘e-clips’ and appear to be overly long – hanging out a few millimetres past the suspension arms. E-clips are a slightly old-skool way of securing the pins and can be hard to install for the inexperienced modeller. Once installed, a dab of thread lock over the e-clip should help to keep it in place through the rigors of off-road crazyness. |
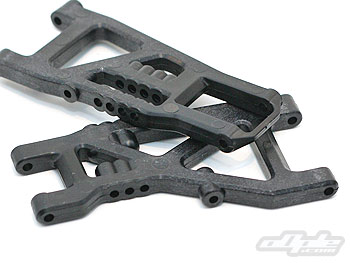 |
Beefy suspension arms - Top:front arm, Bottom:rear arm |
|
 |
 |
Rear inner hinge pins |
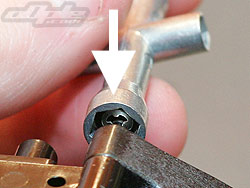
Installing the E-Clips, oOple style! |
|
I admit I have never seen anyone else do this - but for me the easiest and safest way to install eclips like those used on the Keen Hawk, is using the supplied 'Tamiya tool'.
Simply put the eclip in place, on the hinge pin for example. Then carefully position the 'tool' over the clip and apply downward pressure whilst rotating slightly from side to side. Works every time and stops the clips flying into your eye! |
 |
The outboard hinge pins for the rear hubs are captured by a grub screw, rather than using E-clips. The grub screw inserts through the centre of the hub and sits on a flat ground into the hinge pin.
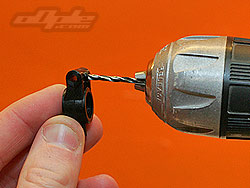
The hub actually needs drilling with a 2.5mm drill bit before you can install the grub screw however. On a car of this level, this is a really odd move by Tamiya. |
 |
With the hub in place on the rear suspension arm - the hinge pin is pushed through with the flat area facing the grub screw – the grub screw needs only gently pressure to stop the pin from backing out. It's very easy to over tighten this grub screw and strip the plastic. |
The Keen Hawk uses the same drive dogbone style drive shafts and axles on all four corners. The dogbones are fully metal in construction rather than the embarrassing plastic junk used on some recent Tamiya off-roaders. Universal or ‘CVD’ style drive shafts would be a nice upgrade later, especially at the front – but the included items are more than up to the job.
The foam installed in the differential out drives does both the job of sealing the differential from dust – and also pushed gently on the dogbones to keep them seated correctly. |
 |
|
|