Previous - 1 - 2 - 3 - 4 - 5 - 6 - 7 - 8 - Next

Electrics & Engine
The 801XT has a sealed radio box to house the receiver and battery pack, and this needs assembling from four main parts. There are seperate lids for quick access to the receiver and hump-configuration receiver battery. A rubber switch cover is included and after previous experience, I mounted the switch so it turns on in the down position - a heavy landing can knock the switch down so mounting it the other way could cause everything to turn off!

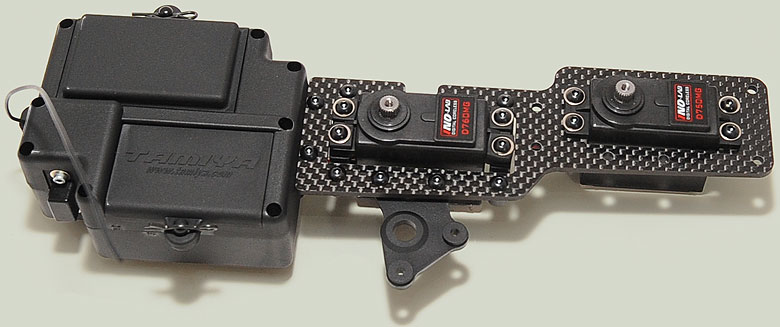
I managed to get hold of a couple of new servos imported and distributed by Trakpower and manufactured by Ino-Lab in Korea, for use in the TRF 801XT. Ino Lab are more known in the RC flight arena but with quality servos like these are starting to make an impact in racing circles.

I got the HG-D750MG & HG-D760MG ino-lab servos to try. The servos are very similar but whilst the '750' concentrates on all out torque, the '760' is designed for speed. With a nippy transit time (to 60 degrees) of 0.12 seconds but a massive 13.30kg of torque, the '750' fit the job of handling the steering on this huge beast perfectly.
The other servo - the '760', still has plenty of torque with 9.60kg, and with a rapid 0.09 seconds transit time - it would be ideal for the throttle / brakes.

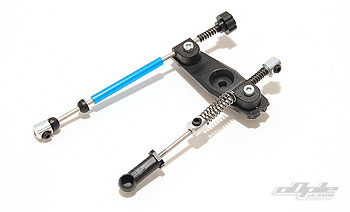
The assembled throttle / brake linkages. Only one link for the brakes due to the innovative setup on the 801XT.

The radio box in bits
No frills, just a good value robust servo

Tamiya don't supply any servo horns with the 801XT kit so you need to supply your own. The Ino-Lab servos come with the usual horns and rubber mounts - though the horns, like with most servos, weren't really suited for this purpose. Luckily ino-lab use the common Futaba spline and I had some suitable horns in my pitbox already.

The entire radio tray can be removed with 8 screws for cleaning.
Details of the linkage setup.

I didn't have an engine when I got the 801XT and started building it - but I managed to borrow one from DMS Racing shop in the UK.  Darren from DMS had the engine ready to put into his own truggy, but a lack of time meant he'd not get round to it for a while. So Darren offered the engine to me for as long as I needed it - what a nice chap.  The main thing though was that the engine - a Novarossi REX .21 - had a blue head to match the TRF truck - vitally important for looks.

Assembling the clutch is fairly straight forward - Tamiya supply their own clutch shoes of course but I decided to use the new shoes from Answer-RC which come with a range of springs to adjust setup.  The flywheel Tamiya supply is anodised blue - which looks really nice when new, but will surely look a little tatty after a couple of race meetings.

Above: installing the Answer RC clutch set.

A 13 tooth clutch bell sits over the clutch and the engine is ready to install on the provided 2-piece alloy mounts.

Because of the low side guards there's no need to hack away at the plastic for the exhaust install - it simply sits over the edge. The air filter finishes off the engine install and uses just a one stage foam.

  Sticking the filter foam in one of the left over empty parts bags and a liberal squeeze of the filter oil. a couple of minutes of squishing makes a nice girly pink filter - yay.

Above- preparing the tyres and gluing properly is vital with so much power going to the ground.

JConcepts kindly supplied the wheels and tyres for the review since none are included in the kit.

The wheels are called 'rulux' and as I already use the smaller cousins on my 1/10th scale buggies I knew I had to have them - it's a cool design and really darn strong. JConcepts make the wheels in two different offsets and since the 801XT is designed for zero-offset wheels these are the ones I got.

JConcepts currently only sell two designs of truggy tyre and these are mainly designed for dirt tracks - I knew I'd want a fairly agressive tyre and chose the 'goose bumps' which should dig in pretty well to soft ground I was expecting to race on.

The wheels and tyres should also be available in a low profile version (larger wheels - lower profile tyre) at the time of publishing.

As with all tyres on a truck this powerful it's wise to prepare them properly (see right).

Previous - 1 - 2 - 3 - 4 - 5 - 6 - 7 - 8 - Next