Mrs.oOple ("Wife") decided to try her hand at Buggy Racing after attending nationals in 2005 and befriending the likes of Em Sheilds, Top Girl-Racer sponsored by Schumacher (not anymore since schumacher ditched off road - but hey). Mrs.oOple ("Wife") decided to try her hand at Buggy Racing after attending nationals in 2005 and befriending the likes of Em Sheilds, Top Girl-Racer sponsored by Schumacher (not anymore since schumacher ditched off road - but hey).
 This is just a brief run through of the process of building one of the best cars around, the Associated RC10 B4, to be suitable for an utterly clueless beginer ! (harsh, but fair- hehe). This is just a brief run through of the process of building one of the best cars around, the Associated RC10 B4, to be suitable for an utterly clueless beginer ! (harsh, but fair- hehe).
My main focus was on making it easy to drive, so I set about building the car with this in mind.
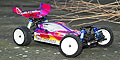
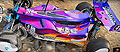
The Car in question is the RC10 B4 Factory Team version, with the full graphite package it's actually not considered as easy to drive as the plastic team car. The plastic chassis being more forgiving. The car does however have lots of shiney alloy parts, and being a car for a girl - the looks are of upmost importance!
I assembled a who's who of top end components (!) in order to make the car as drivable as possible.
MOTOR: Mabuchi RS-540
ESC: Tamiya Teu 101 bk
SERVO: Futaba 3003
RADIO: KO Esprit II
RECEIVER: KO 301
CELLS: Team Orion 2400 |
The Mabuchi motor and Tamiya Esc are from the new Tamiya Hornet kit. I chose the motor in particular for its smoothness, it's not rapid thats for sure, but easily enough for vicky.
You see a lot of beginners, and even experienced drivers, with far more power than they can handle, Not making that mistake here!.
|
BUILD:
Problems building the kit were few and far between, the rc10 B4 is a quality item. There was however a problem with all the silver ball studs in my kit, every one of them was incorrectly manufactured. The threads were not sharp enough or deep enough. Check the first photo on the left is the same ball stud from an early B4, on the right you can see the new one has a thinner shoulder, its not entirely clear but the threads are not enough. This basically meant you could screw them in all the way with your fingers. well, not quite all the way, since they had no grip they wouldnt sit flat.
 |
 |
| Left: Old kit ball stud, Right: New |
Malformed threads on this -wont sit flat. |
Luckily I had some spare ball studs so I wasnt held up, Otherwise I might have had to wait on replacements. I'm sure this is a rare thing, but something to watch out for if you have a new Kit to build. CML Distribution (Team Associated Distributor in the UK) from past experience are very quick and profesional in helping with problems like this, so it shouldn't really be a great concern.
The rear camber plate / brace is a revised item to what I've seen before, basically it's higher - giving the effect of using 2 washers under the ball studs, aparently this is what all the team drivers in the USA use as standard so its been built-in. I'm not very convinced by this, especially since I run 1 washer, I cant see how taking adjustments away is a good thing, just to save the cost of 4 spacers in the kit.
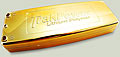
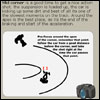
In order to slow the reactions of the car and make it easier to drive I decided to add a Lot of lead to the car. I popped into my local tyre place and aquired some stick-on lead. A long time ago, Mick Cragg modified a rear camber plate for me so it was possible to attach lead, I did the same with this this camber plate and added about 30g of lead under there.
 |
 |
| Left: New camber plate, Right: original. |
Preparing the plate for some Lead |
I also added lead to the chassis in the 2 rear triangles, 25g each side, and the front triangles - 5g each side. Altogether there's approximately 95g of lead in the car. If I had more lead, it would be in there! |